February 2008
Monthly Archive
Mon 18 Feb 2008
Posted by Model Railroader under
Benchwork[4] Comments
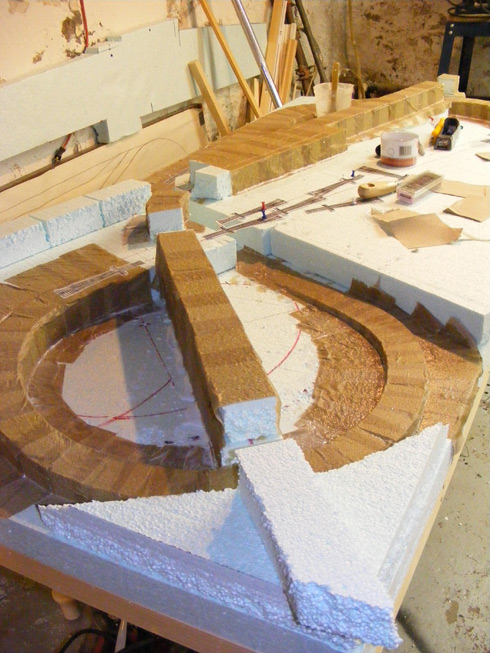
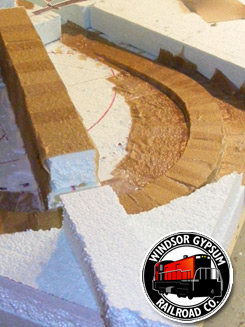
Progress of late has been swift and I’ve almost completed all of the foam benchwork ‘ including the elevations for roads and highways. It took more time to remove the old glue leftover from the false start on the previous incarnation of the WGR then it did to actually construct the new risers!
I read a post by another modeler detailing the he too was going to attempt to use foam exclusively as benchwork material, but was having difficulty making perpendicular cuts using a knife. He went on to explain how he finally discovered that his jig saw was a far better alternative. Using his level as a fence, he guided the saw offsetting the level from the cut line the distance from the saw blade to the edge of the saw foot. Apparently the result was a ‘butter smooth’ perfectly square cut. I’m eager to try this, however as I’ve already finished the majority of the benchwork, and in my household ‘noise’ is a big issue, I’ll leave it up to others to try this technique and decide how it works.
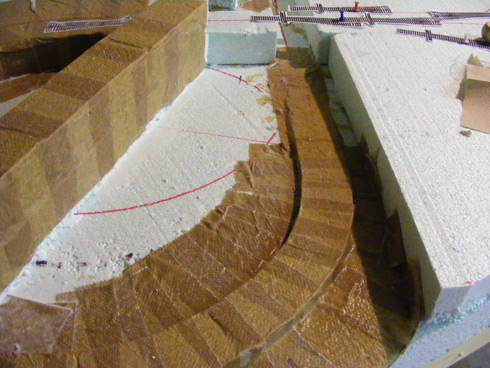
A challenge I needed to address with the foam risers was the gaps in the curves. Woodland Scenics sells a foam-putty intended for gap filling, and using something similar such as drywall compound had crossed my mind. One of the drawbacks of compound is that it really doesn’t stick to foam. I had used it on the NES for gap filling and it worked well, however I learned that I could easily peel it away from the foam, which didn’t reassure me that I really wanted to depend on it for keeping my track secure.
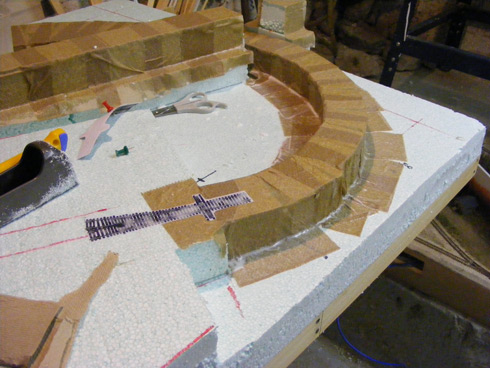
I opted to drape glue-soaked paper towels around the top and sides of the risers and it has worked out well. I slathered the foam with some 2:1 glue/water and then applied the strips of paper towel – brushing everything as smooth as possible as I worked. It took little time to cover all of the risers and the results are rock-solid. The paper towel fused the risers into one continuous run, and the gaps are effectively filled. While white glue won’t permanently fuse to foam, wrapping the paper towel around the sides should result in a secure bond.


Mon 18 Feb 2008
Posted by Model Railroader under
Trackplan[6] Comments
As the benchwork progresses I’ve had some time to test some 1:1 track planning and I’ve been making small modifications to the plan. I decided that I would stay from the prototype in favour of a slightly more operational yard. Granted ‘ the yard is small ‘ but isolating yards movements from the mainline will be advantageous. One of the benefits is that the track itself ‘looks’ more like the prototype, even though it’s not the same.
Likewise, a suggestion was made by a reader that I consider including the now defunct Nova Scotia Textiles building. While I cannot pinpoint the exact location of the mill, I do know it resided on King St., overlooking the Windsor yard ‘ so for the time being I’ve included it as part of the design. I’ve had difficulty finding any images of the mill, so if anyone can direct me toward any images I’d be thankful!


Sat 16 Feb 2008
Posted by Model Railroader under
'Short-lines'1 Comment
The last few weeks have seen a sharp decline in RR efforts as life’s usual trappings (work, family, house) have needed some attention. That being said, my track and turnouts did arrive from Fifer Hobby Supply and I want to take an opportunity to laud Mike and Robin Fifer on their business.
I knew nothing of FHS until I became a member of the nscale.net community and read endlessly positive comments about their business. Based on these recommendations I decided to give FHS a try.
There was nothing unique about my order ‘ some C55 atlas track and switches. Despite the recommendations I thought I would do some online price shopping and see how things compared. In the end I found only one store that had the same offerings for a marginally lower price ‘ but as they did not ship to Canada the point was moot (not to mention I had never read a single positive review about them).
The FHS online store indicated that one item was out of stock. I contacted Mike and Robin who took my order in full via email and assured me the stock would arrive shortly. The refused to let me pay for any of the order until it was ready to ship. Shortly thereafter I got an email noting all the items were in stock, and they sent me the final tally including shipping ‘ a very good price!
When my order arrived, it was immaculately packed and undamaged. Based on the size of the package and the distance it travelled I was convinced that that shipping costs were very fair (if not low), and it was evident that FHS hadn’t tried to hide some handling costs to increase revenue. The only added expense was the GST and PST ‘ duty did not apply.
In the end my order cost me about 45% less then it would have had I shopped at ANY of my local hobby shops. Typically I would support local businesses, however the price difference was too great, and upon reflection I grow increasingly aggravated with my LHS as I question why their prices seem so out of line with others. On one hand I’m sympathetic to the inherent costs of having goods shipped internationally and paying rent, but our recent (and sustained) dollar parity hasn’t been reflected in local prices which makes me rather suspect of my LHS prices. If you aren’t going to attempt to pass along your savings to me then I will shop elsewhere.
In closing, Fifer Hobby Supply is a friendly, competitively priced, easy to use online store staffed by genuinely nice people who take pride in their business, value customers, and understand the benefit of good communication. I wish you continued prosperity and look forward to placing my next order.
Tue 5 Feb 2008
Posted by Model Railroader under
Benchwork[7] Comments
Keeping with my ambition to construct the majority of the WGR with foam, I have been experimenting with a few different construction techniques in an effort to create foam risers much like those offered by Woodland Scenics. Although my first efforts have been removed due to a change in track plan, the technique I used was very straightforward and fast – allowing me to construct all of my initial bench work in a few evenings.
Step One: Transfer the track plan onto the baseboard, and mark the elevation endpoints. In this example the track is crossing over itself so the elevation endpoints account for a ‘bridge’ and the track below it.

Step Two: Draw a line following the inside curve of the area, offsetting the original centerline by 1″. The 1″ offset allows for the foam (in this case 2″) to follow this new smaller circumference as a guide, so that once installed the risers foam can be easily cantered over the original plan. With this new guide drawn, measure the total length between elevation endpoints using a piece of string.

Step Three: Transfer the length of the string on a new sheet of foam and mark each end with the starting and ending elevations – these elevations should be drawn perpendicular to the riser length – in this case 0″ and 2″. Connecting the two points will create a long wedge that represents the grade between the connecting points.

Step Four: Using a sharp utility knife, and a thick straightedge (such as a board or a level) make light cuts by continuously draw the knife through the foam along this line, keeping the knife against the straightedge to ensure the cut is both strait and square.

Step Five: Cut the ‘wedge’ into 2″ long segments

Step Six: Using foam-safe glue such as PL300, affix the wedges along the edge of the inner line – ensuring that each corner touches the next (unlike the illustration), otherwise the resulting grade will be to long.

Finally, once the glue has completely dried, any imperfections can be removed by lightly sanding the tops of the risers using a sanding block or rasp.
There you have it – a fast and dirty tutorial on how I created my original grades. Now I just need to get to work on the new plan!
Fri 1 Feb 2008
Posted by Model Railroader under
Trackplan[2] Comments
After having scrapped the initial WGR plan, I decided that I would revisit my collected references on the WHR’s Windsor Yard – the original inspiration for this project. The more I considered the function of Windsor Yard the more I realized that it was this singular location that I was interested in and that I should base my new design on this area. Likewise, I started rethinking my space and my desires. The original WGR plan had utilized all sides of the baseboard and as I started building the risers I started to truly appreciate the space needed to operate the pike from all sides – the space required for a full perimeter layout defeated the purpose of building a small pike as I now required several feet of space on all sided of the layout to run it. Therefore, I considered how the plan might work if I treated it as a deep shelf, and if I eliminated Windsor Junction. The result (seem below) was a more accurate depiction of the yard as well as the surrounding geography. At first I was disappointed at ‘what I had lost’, but I started to realize all that I was gaining. This arrangement allows for deeper scenic treatments, and improves the track/scenery ratio – focusing on the neighbouring fields, highway and the all important ‘nothing’ in between.
I sat on this idea for a day trying to decide if I would be happy with this new approach when I received an encouraging note from a reader, Allen, who in one fell swoop characterized the function of Windsor Yard, and offered an approach that was similar to what I had been considering. This input has wiped out any doubts I had about this more minimal design, so without further ado, I humbly present the new WGR – leaner and meaner! (I’m still considering the track arrangement in the yard – so things might change slightly over the next few days)
Side note: one of the details that has been staring me in the face since I started considering modelling this railway was the fact that I can easily include some passenger operations. The WHR offered a seasonal passenger service along the Evangeline Trail – a perfect excuse to model some unique passenger equipment!
