I decided that now was the time to try my hand at sculpting some figures for the layout, as I needed to know what clearances were required when laying the track, and until my engine was done, and Pete (the engineer) was seated, I wouldn’t be able to start building. I did a little searching online and came across an outstanding article on myLargeScale.com, outlining how to create large scale figures using tinfoil armatures and polymer clay. I skimmed the article and decided that it was worth trying.
(I’m not going to bother detailing how I sculpted the figures, as myLargeScale.com thoroughly documents the process.)
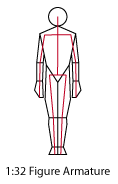
 Firstly, I used a wire armature for the body rather than tinfoil as it was more rigid and allowed me to pose the figure more easily. Using a proportional template ensured that the basic dimensions of the figure were correct. I systematically sculpted each detail starting at the feet, baking and re-baking the figure each time I added new details. The polymer clay tended to darken each time I baked it, so you can see how I started with the feet and worked upwards. Each time the figure was in the oven, I sculpted several heads in an attempt to come up with a suitable visage. By the time I had finished the body I had created about a dozen mediocre heads. I selected the best of the bunch and attached it to the body with a bit of clay.
In the end, it took roughly three hours to come up with the figure, and I’m generally happy with it. The body is good, but the face is crude, large, and proportionally ‘off’. When I build my next figure, I’ll be sure to purchase harder clay, as the product I was using, Sculpy, seemed too soft and tended to melt in my fingers as I worked with it – which made modelling the facial features very difficult.
Oh, and I made some pumpkins!
 (Please excuse the poor image quality)
0 thoughts on “Sculpting Model Railroad Figures”
Ed says:
Cool project! I’ve added a comment on your layout on my Model Railroading blog: http://ten87.blogspot.com/By the way, my son uses a mini-crockpot for baking the polymer clay. It works great and never burns. Just place the item on a sheet of wax paper in the bottom of the crockpot and take it out about 8 hours later. It always comes out perfect… Ed
Anonymous says:
Thank for the tip, and the link! As soon as I learn to be patient I’ll be sure to try the crock-pot technique. I’m now finding that the overcooked bits on my character are a little brittle, so I’ll be looking to refine my approach…
Wahoo says:
Thank you for sharing!
Melissa says:
I really enjoy reading about your projects, and watching how everything is coming together!
I have been a polymer clay artist for about 12 years now, and have found many techniques for curing. First, if you are going to be using translucent, make sure you are tenting your projects. Actually this goes for any color of PC. I use two tins pans, and aluminum foil. Crock pots are fine if you are not selling your project, but for proper curing, you need to be able to know what your oven is heating to. Depending on the brand of clay you are using, it must be cured to a certain temp (instructions on package) before it will properly cure. Otherwise, you will risk breakage, cracking, etc. later on. For the tiny bits, add them after you have cured the biggest parts, and cure again for the time and temp specified on the package. Otherwise, you can also use a heat gun for rally thin parts. Just make sure that you are moving the gun back and forth, and not keeping it straight on the project, or you risk burning. Hope these tips help! Please feel free to email me if you have any questions! Have fun!