Keeping with my ambition to construct the majority of the WGR with foam, I have been experimenting with a few different construction techniques in an effort to create foam risers much like those offered by Woodland Scenics. Although my first efforts have been removed due to a change in track plan, the technique I used was very straightforward and fast – allowing me to construct all of my initial bench work in a few evenings.
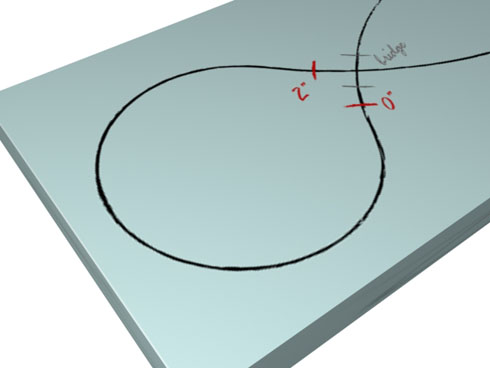
Step One: Transfer the track plan onto the baseboard, and mark the elevation endpoints. In this example, the track is crossing over itself so the elevation endpoints account for a ‘bridge’ and the track below it.
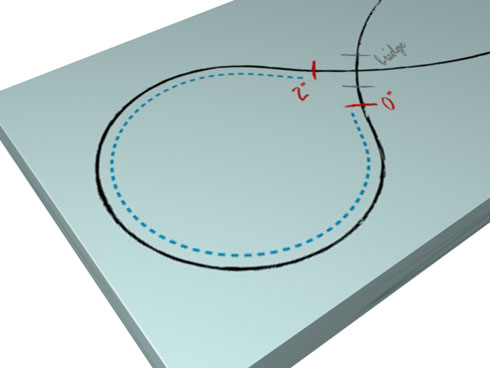
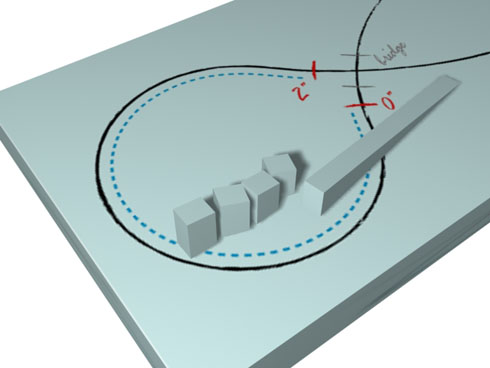
Step Two: Draw a line following the inside curve of the area, offsetting the original centerline by 1″. The 1″ offset allows for the foam (in this case 2″) to follow this new smaller circumference as a guide, so that once installed the risers foam can be easily cantered over the original plan. With this new guide drawn, measure the total length between elevation endpoints using a piece of string.
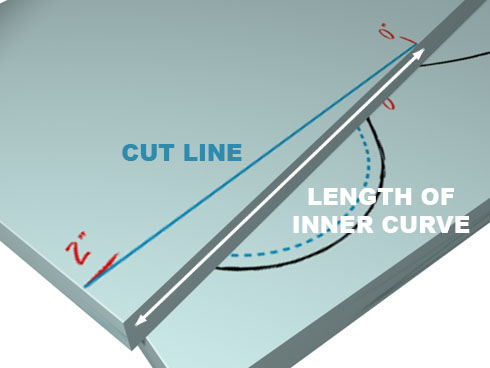
Step Three: Transfer the length of the string on a new sheet of foam and mark each end with the starting and ending elevations – these elevations should be drawn perpendicular to the riser length – in this case 0″ and 2″. Connecting the two points will create a long wedge that represents the grade between the connecting points.
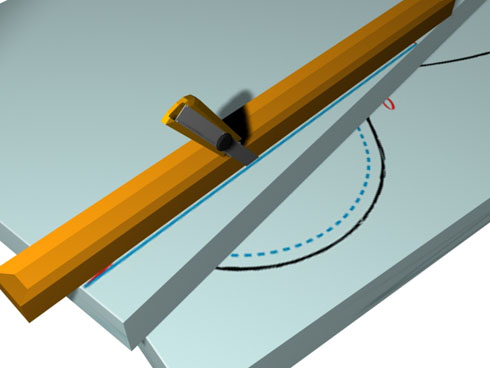
Step Four: Using a sharp utility knife, and a thick straightedge (such as a board or a level) make light cuts by continuously draw the knife through the foam along this line, keeping the knife against the straightedge to ensure the cut is both strait and square.
Step Five: Cut the ‘wedge’ into 2″ long segments
Step Six: Using foam-safe glue such as PL300, affix the wedges along the edge of the inner line – ensuring that each corner touches the next (unlike the illustration), otherwise the resulting grade will be to long.
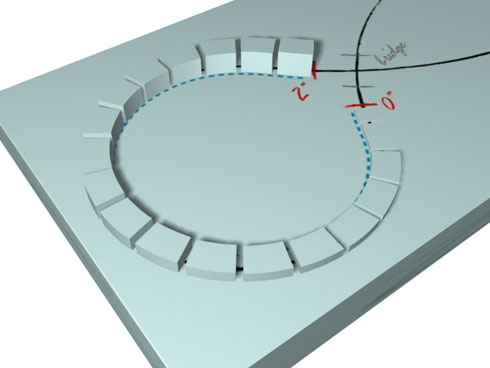
Finally, once the glue has completely dried, any imperfections can be removed by lightly sanding the tops of the risers using a sanding block or rasp.
There you have it – a fast and dirty tutorial on how I created my original grades. Now I just need to get to work on the new plan!
0 thoughts on “Styrofoam Risers”
Allen White says:
How did you make the actual cut through the foam? Do you use a blade longer than the depth of the foam and repeat the light cuts against the straightedge, pushing deeper each time? I’m curious as I cut foam for the first time the other day using a variety of methods to see what gave the cleanest cut, and the utility knife was clean but very hard to make a straight and square cut with. Scoring and snapping was nice and smooth but not necessarily square.
Model Railroader says:
Hi Allen,
I used one of those large utility knives – the ones that have the snap blades that you can extend about 4″. As you said I made a few light cuts, and replaced the blades often – as soon as they showed signs of dulling. While cutting, I held the knife fast against the level (which as a deep edge) or a 2×4. By keeping the blade tight against the side, the knife was kept perpendicular to the foam and resulted in a smooth cut. In my first attempts, I had simply scored the foam halfway through and snapped it. Once glued, I smoothed the rough edge with a rasp.
Thanks for the question!
Scott says:
WE are going to build some new modules for our Free-Mo style layout and was wondering how to do a grade from the mainline down to an industrial area that crosses under. Now I know!
Thanks
Bob says:
Fantastic illustrations to go with the description! I saw your earlier work on your first plan for the Gypsum, and thought it looked like a good idea. After a trip to the “Big Box” last Sunday, I have all the materials to start on my own hollow core layout of the Duluth Missabe & Iron Range.
While I’m not as adventureous as you and am relying on a hollow core door as my base, I am planning on building everything else out of foam, including the inclines. I plan on doing it almost exactly as you’ve described, except I have a few questions.
I’ve seen people wrap the risers in plaster as to cover the gaps and provide a slightly firmer surface for roadbed and laying track. Is this what you plan to do? I was thinking of taking a slightly different approach after eyeing something at the hardware store. It’s a product called MDF and what drew me to it was first, it was dirt cheap, and second, it seems to be fairly rigid for it’s thickness. I was planning on laying “cookie cutter” style MDF on top of the foam base, then laying cork on top of it.
Oh, and the new track plan looks good!
Model Railroader says:
Hi Bob,
I’ve been doing some thinking about covering the gaps and I think I’m going to try wrapping the risers in glue-soaked paper towels. Plaster is heavy and messy, and I don’t think it has great adhesion qualities. We’ll see!
normd says:
I just posted someting about this subject but it want into the “artwork” posting replies! We did a 60′ layout extension using mostly foam; base, risers, mountains, the works.
Jim Roberts says:
Excellent method. Link over from nScale.net and glad I did. I’m going to try your method.
Cheers,
Jim R